Monday, May 8, 2017

No Bake M&M Chocolate Chunk Almond Butter Oatmeal Protein Bites


Looking for a snack that's filled with protein and with a touch of sweetness? You've come to the right spot! You're about to learn your new favorite recipe for a protein filled on-the-go snack that's easy to make, easy to eat of course, and easy to save for later! Start writing your shopping list, because today you're going to the store to get all of the ingredients for some No Bake M&M Chocolate Chunk Almond Butter Oatmeal Protein Bites! Wow, that was a mouthful, and soon enough you'll be devouring these puppies in your own mouth! 

There's nothing better than no bake delightful desserts. The fact that this recipe is the perfect balance of healthy fats, protein, and a dash of mouthwatering chocolate is Heaven in a bite sized snack. These are so simple, only take about 15 minutes to make, and hit the spot when you're looking for a quick energy boost and a way to curb that sugar craving. Now let's get down to the details.

Ingredients

1 Cup Rolled Oats
1/4 Cup M&Ms
1/4 Cup Chocolate Chips
1/2 Cup Crunchy Almond Butter
1/2 Cup Flaxseed
1/3 Cup Honey
1 Tsp Vanilla Extract


Instructions

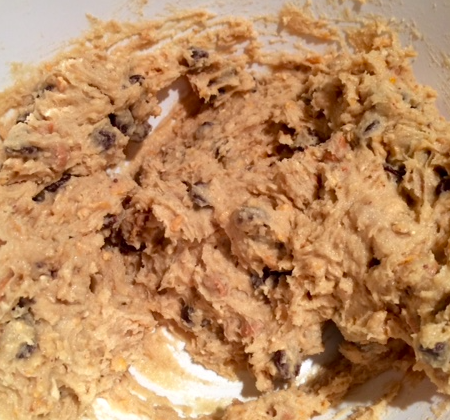
1. Combine all ingredients in a large bowl and mix together
2. Line a large baking sheet with tin foil
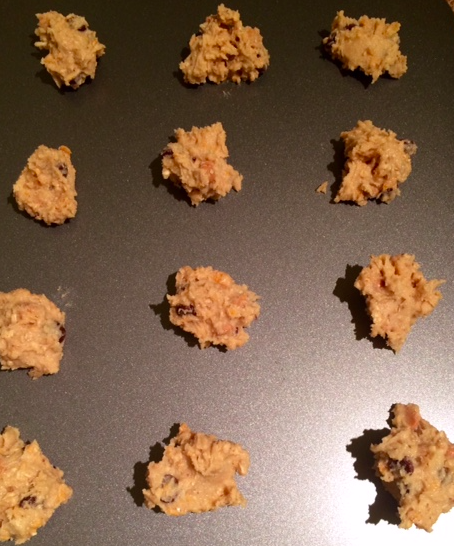
3. Using a spoon or your hands, form mix into small balls and place onto baking sheet
4. Repeat until you've used up all of the mixture
5. Freeze the bites for an hour 
6. Wait for the timer to go off and immediately devour

Let me let you in on a little secret. I always take the recipe and double it since I already have all of the ingredients on hand and I also have a large enough baking sheet to easily fit about 50 bites on it. This is a time saver and since the bites last weeks in the freezer, it's a no brainer to me. So anytime I'm craving a small treat, I grab one from the freezer and pop it in my mouth to enjoy. 

These are a great way to start your day, great snack before or after a workout, and a great after dinner dessert bite.  These are also best frozen in my opinion, but can be refrigerated as well. It's like the trick of freezing candy bars and Thin Mints, there's something about that chilled temperature that takes the whole flavor up a few notches.  

Note that many of these ingredients can be substituted or removed. I personally love flaxseed, but i know not everyone feels the same way or it may not get along well with your body. I used crunchy organic almond butter as a healthier option, but any type of peanut butter can be used. If you prefer smooth peanut butter, you can also add 1/4 Cup dry roasted peanuts. If you don't like M&M, you can add 1/2 Cup chocolate chips instead. This recipe is extremely versatile and is so easy. Next time you have 15 minutes to spare, make a big batch of these bites and you'll be set with a healthy snack option for the next few weeks! Trust me, they are SO good! Enjoy!

Sunday, April 30, 2017

Skinny Banana Chocolate Chip Muffins

Spring has sprung which means that summer is on your mind and right around the corner! You're daydreaming about the beach and wearing the new swimsuit you just bought in the warm ocean. You're aiming to get that picture perfect beach bod but know that life is all about balance and there's always s time to treat yo' self and that sweet tooth of yours. So join me today in making these Skinny Banana Chocolate Chip Muffins and fulfill that sweet tooth urge

With using greek yogurt, almond milk, and whole wheat, you're on the healthy track with these substitutions! These muffins are easy to make on a Sunday morning (I just woke up and had the urge). They are filled with banana and chocolate chunks and fresh out of the oven they're gooey and smell delicious! They're the ideal treat, on the go snack, and are easy to freeze and reuse. It's the perfect amount of sweetness to make your tastebuds stand up and give you a high five. Did I convince you yet? Here's what you need to know to get started!


Ingredients
1 1/2 Cup Flour (Whole Wheat for the skinniest option)
1 Tsp. Baking Soda
1/4 Tsp. Salt
1 Tsp. Cinnamon
3 Ripe Bananas
1 Tsp. Vanilla
1/2 Cup plain Greek Yogurt
1 Tbsp. Almond or Soy Milk
1/2 Cup Mini Chocolate Chips
1 Egg
4 Tbsp. Honey
1 Tbsp. Olive Oil

Instructions
1. Preheat oven to 350 degrees
2. Spray muffin tin (regular or mini) with olive oil spray
3. Mash bananas and add vanilla, greek yogurt, milk, egg, honey, and oil. Mix together until smooth
4. Combine flour, baking soda, salt, and cinnamon in another bowl and mix
5. Add dry ingredients in step 4 to the wet ingredients in step 3 and mix until fully combined (Works great in a Kitchen Aid if you have one, but hand mixing also does the trick!)
6. Add chocolate chips last and mix together
7. Add mixture to muffin tin and fill to the top. Bake mini muffins for 15 minutes and regular sized muffins for 20-25 minutes
8. Cool muffins for 4-6 minutes before placing on a cooling rack
9. Devour and enjoy!

I felt like Amelia Bedelia when making these delicious banana chocolate chip muffins. I loved reading her stories when I was little, and it made me smile to remember her silly personality and decadent recipes. I had a few extra rip bananas lying around and put them to extra good use. These muffins are mouthwatering and will be gone instantly! 

Friday, December 16, 2016

Peanut Butter Cup Cookies

It's beginning to look a lot like Christmas and I've been baking up a storm for the holiday season! Today I'll be sharing one of my favorite recipes with you, Peanut Butter Cup Cookies! Pretty much everyone I know loves peanut butter cups, and adding them to a peanut butter cookie is absolutely divine! These are perfect for a Christmas cookie exchange or for any time of the year. Here's all of the information you need to know!

Ingredients
1 Package Mini Reese's Peanut Butter Cups
1/2 Cup Peanut Butter
1 3/4 Cup Flour
1/2 Cup Butter, softened
1/2 Tsp Salt
1/2 Cup Granulated Sugar
1/2 Cup Brown Sugar
2 Tsp Milk
1 Tsp Vanilla
1 Tsp Baking Soda
1 Egg

Instructions
1. Preheat oven to 375 degrees
2. Unwrap Peanut Butter Cups
3. Mix Peanut Butter, Brown Sugar, Granulated Sugar, and Butter until smooth and fluffy
4. Add Vanilla, Milk, and Egg and mix together
5. Add Flour, Salt, and Baking Soda to mixture until completely combined
6. Roll dough into small balls that will fit in a mini muffin tin
7. Bake for 8-10 minutes
8. Immediately press Peanut Butter Cups into each cookie until you covered them all

9. Cool completely 
10. Enjoy!

I've made these cookies a few times and they are always a hit. They're pretty quick to make, especially when you're baking with a friend so one can roll the balls and the other can unwrap the cups! 

Peanut butter and chocolate is always a safe dessert choice. They are always consumed immediately and my guests are always wanting more!  Biting into the soft peanut butter cookie stuffed with a peanut butter cup is absolutely mouthwatering. They are delectable right out of the oven with the oozing chocolatey peanut butter cup melting in your mouth, or even delicious completely cooled. It's a great alternative to the typical Hershey Kisses on top of the peanut butter cookies. Although I like those cookies, I like to surprise people with this twist that tastes even better! Baking cookies really gets me into the holiday spirit, and it's one of my favorite ways to celebrate the season

Here's my friend and I each with our own plate of cookies, and of course I'm holding my Peanut Butter Cup cookies! Go ahead and grab your friend and start baking these! 'Tis the season!


Friday, December 9, 2016

Powdered Secret Kisses Cookies

Ho ho ho! Hope you're all enjoying the holiday season and are making spirits bright every day! One of my favorite traditions during the holidays is baking Christmas cookies and trying new recipes and creations every year. This time, I made Powdered Kisses Cookies. It's a cookie covered in powdered sugar, with a SECRET Hershey's kiss on the inside! They are incredibly delectable and I want to share this secret recipe with you! Here's what you need to know to bake these fabulous treats.

Ingredients
1 Bag of Hershey's Kisses
1 3/4 Cup Flour
1 Cup Butter
1/2 Cup Granulated Sugar
1 Cup Chopped Walnuts
1 Tsp. Vanilla
Powdered Sugar

Instructions
1. Combine butter, sugar, and vanilla in a large bowl and stir until well mixed
2. Add flour and walnuts and continue to stir until all is mixed together
3. Cover mix and refrigerate for 1 hour
4. Unwrap Hershey Kisses and set aside
4. Preheat oven to 375 degrees
5. Take the Hershey Kiss and cover it with the hardened mixture so no chocolate is showing and roll into a ball

6. Line baking sheet with wax paper and place the balls evenly apart on the paper
7. Bake for 12-14 minutes
8. Take cookies out of the oven and let them cool for a few minutes
9. Roll cookies in the powdered sugar 
10. Devour!

This secret recipe is absolutely delightful!  When you take a bite of the cookie, especially right after it cools and it's drenched in powdered sugar, the milk chocolate oozes into your mouth and makes you feel like you're on top of the world. It's soft, has a slight crunch from the walnuts, and is super smooth going down. Definitely bring these to your next cookie exchange, and don't tell them about the secret Kiss inside until they take their first bite. Everyone will be in Heaven and will love the secret surprise! Merry Christmas!  

Thursday, December 1, 2016

Rice Krispies Turkey Legs - Dark Meat Edition

Happy Holidays! 'Tis the season to start blogging again after a long hiatus, 'tis the season to be jolly and 'tis the season for baking sweet & festive desserts! Everyone knows that Thanksgiving dinner and holiday meals are not complete without a turkey. Instead of eating and baking the real thing, we're making Rice Krispies Turkey Legs the Dark Meat edition! I know you're all excited about the dark meat, because who doesn't love milk chocolate covered pretzels, topped with Rice Krispies treats! Here's all you need to know to make this simple and delicious festive treat!

Ingredients 

1 box of Rice Krispies Cereal 

1 bag of Mini Marshmallows

6 Pretzel Rods

Semi Sweet Baking Morsels

 1/4 Cup Butter

Instructions

1. Break pretzel rods in half and place on a baking sheet covered with wax paper.

2. Melt chocolate in microwave or stove top

3. Once chocolate is melted, dip the end of the pretzel rod into the chocolate, and have your mini marshmallows nearby to stick two onto the dipped end.  You will need two mini marshmallows per rod.  Let the marshmallows and dipped ends sit for a few minutes until they are all tightly stuck together.


4. After marshmallows and dipped ends of the pretzel are hardened, dip the whole pretzel in the melted chocolate. Repeat until all twelve sticks are covered in chocolate. Once finished, put the rods in the refrigerator for 5 minutes to completely harden.


5. While the rods are hardening in the refrigerator, melt the remaining marshmallows and butter together in the microwave or on the stovetop. Stir the mixture until it is as fluffy and mixed as this photo.


6. Then add the Rice Krispies into the mix and stir until all of the ingredients are mixed together.


7. Use wax paper to grab small amounts of the Rice Krispies mixture into an oval shape.  This will help reduce the stickiness on your fingers and is easier to mold. 

8. By this time, the rods should be completely hardened and ready to combine with the Rice Krispie ovals.  Place each Rice Krispie on top of the chocolate covered rods and make sure none of the bare rod is displayed.

9. Repeat until each of the rods are topped with the Rice Krispies.

10. Drizzle any remaining chocolate onto the top of the Rice Krispies to finish the dark meat effect and add some extra delight.

11. Place the finished product back into the refrigerator to set and completely harden.

12. Share the wealth, grab a bone, and enjoy!


I love Rice Krispie treats and chocolate covered pretzels, so this was a phenomenal combination!  I love my twist on the dark meat edition because nothing compares to dark and milk chocolate.  Your guests will love these as much as you and will be greatly impressed by your creativity.  Don't worry, no bite will disappoint because there's no opportunity for a piece of bad meat here!  And who doesn't want to eat the whole turkey leg,  that is delicious down to the bone :)

This creative dessert is such a fun way to get into the holiday spirit, and is so easy to make. 


Friday, April 24, 2015

Bride to Be Candy Basket


Wedding planning is fun, always very busy, and can get hectic at times.  There's so many things to constantly check off your to-do list, people to call, invitations to send, and favors to pick out.  I love being a Bride to Be and am enjoying my engagement to the fullest.  I cannot wait for the big day

It's always fun to receive parcels in the mail.  Who doesn't love a brown box addressed in your name?  I love getting packages and when one came addressed to "Chelley Candy" from Candy Crate, I was so excited to open it!  I thought it was Easter candy for me to review but to my surprise, it was an adorable Bride to Be Candy Basket!  

It was so thoughtful of Candy Crate to send this and I was so genuinely happy when I opened the box and saw my Bridal surprise that I couldn't stop smiling.  The basket was filled with wedding related candy including the following:


Candy Garter - Let me tell you, I definitely want to wear the Candy Garter at my wedding, we'll just have to see if I can wait that long to eat it myself!  

Heart Shaped Lollipops - Two tiny scrumptious lollipop hearts! 

Ring Pop - Who doesn't love to flash that big bling on your finger!

Sugar Daddy - Everyone needs a $ugar daddy in their life!

Big Hunk Bars - Delicious and totally describes my groom to be!

White Jordan Almonds - Almonds taste bittersweet so when mixed with candy sugarcoating, the tradition is to wish a newlywed's marriage to be more sweet than bitter!

White and Silver wrapped Hard Candies - Lemon flavor in the silver wrapper and a butterscotch taste in the white wrapper that was creamy and smooth! 

Just Married Candy Rolls - The Just Married symbol is subtle but once you notice it it's so cute!  I thought they were mints at first and then tasted the sweet rolls and to my surprise they tasted like Smarties!


When I get married, I know I want to have a candy buffet at my wedding.  I know the guests will love it and know how sweet love is!  I cannot wait!

Thank you to Candy Crate for making this Bride to Be so happy!  I loved this sweet surprise and all of the wedding related scrumptious candies!  So sweet of you!

Sunday, March 1, 2015

Peanut Butter and Chocolate Chip Cookie Kit


There's not many people who don't love the combination of peanut butter and chocolate.  Kimber's Cookies brings those two delicious flavors together in an easy to make cookie kit that makes three dozen cookies!  The design on the kit is so cute.  I loved the font and colors and the fun, simple, and easy instructions on the back.

Ingredients
1 Egg

1 C Unsalted Butter

2 Tsp. Vanilla

Instructions
1.  Preheat oven to 350 degrees
2. Mix Package 1 with 1 cup of melted unsalted butter (2 sticks)
3. Mix in 1 large egg and 2 teaspoons of vanilla
4.  Add in package 2 and 3 and stir

5.  Roll dough up into small balls and placed on engrossed cookie sheet
6.  Bake 12-16 minutes
7.  Cool and enjoy!

These cookies are fun to make on a night in with friends and the perfect dessert!  They're crunchy with just the right amount of chewiness and have a great texture.  Once again, the peanut butter and chocolate chip combo wins!